 Tktem
Tktem user guide
Tktem designs QR code labels, lays them out on a sheet of paper and creates a PDF that prints at true size. This guide covers the app on Windows. A macOS section will follow once it has been tested on a Mac.
In this guide, bold text is the name of a button, field or section exactly as it appears on screen.
Contents
- 1. What Tktem does
- 2. Installing and first start
- 3. Key ideas
- 4. Quick start: your first label in 5 minutes
- 5. The Design screen
- 6. The Data screen
- 7. The Sheet & export screen
- 8. Quick print
- 9. Printing at true size
- 10. Saving and managing templates
- 11. Errors and warnings
- 12. Keyboard shortcuts
- 13. Troubleshooting
- 14. What Tktem does not do
1. What Tktem does
Tktem is made for two kinds of users:
- Template designers draw the label, choose its data and lay it out on the sheet.
- Print operators pick a finished template, enter a code range and create the PDF.
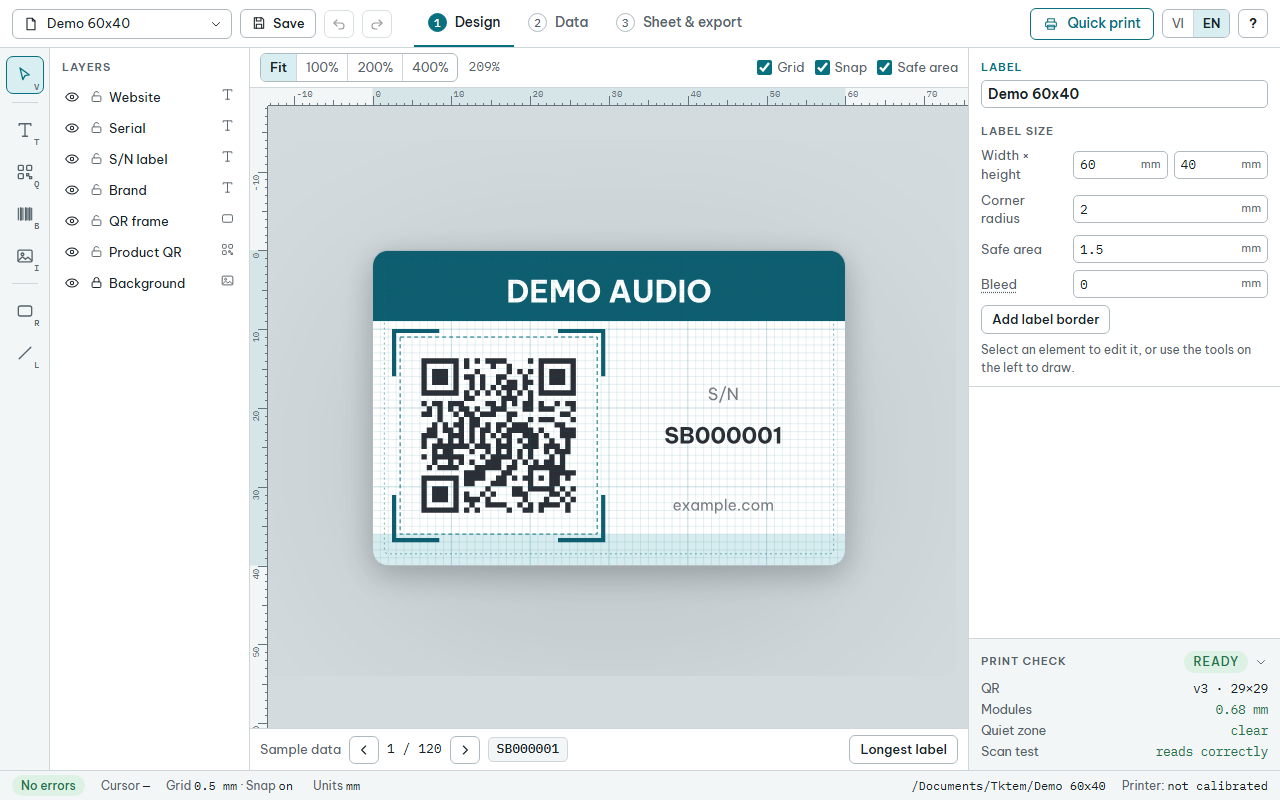
The app has four screens, chosen in the bar at the top:
| Screen | What it is for |
|---|---|
| Design | Draw the label: QR codes, barcodes, text, images, borders. Preview it with real data. |
| Data | Give every label its code: a number range or a CSV file. |
| Sheet & export | Lay the labels out on a paper size or on a print shop's die-cut PDF, then create the PDF. |
| Quick print | Pick a template, enter a code range, create the PDF. The design cannot be changed here. |
Tktem works without an Internet connection.
2. Installing and first start
2.1 Installing on Windows
Tktem needs Windows 10 (version 1903 or later) or Windows 11.
- Open Microsoft Store from the Start menu.
- Search for "Tktem", open its page and click the install button. No administrator rights are needed.
- Once it is installed, start Tktem from the Start menu.
Microsoft Store updates Tktem when a new version comes out, like any other app.
If the computer has Tktem installed from a downloaded setup file (Tktem_<version>_x64-setup.exe), uninstall that one first (see 2.4), so that the Start menu has only one Tktem. Leave the "Delete the application data" box unticked: the version from the Store then carries on with your settings, including the language, calibrated printers and print history.
2.2 First start
- The first time, the app uses the language of Windows: Vietnamese on a Vietnamese Windows, English otherwise. Switch it in the top right corner (see 2.3).
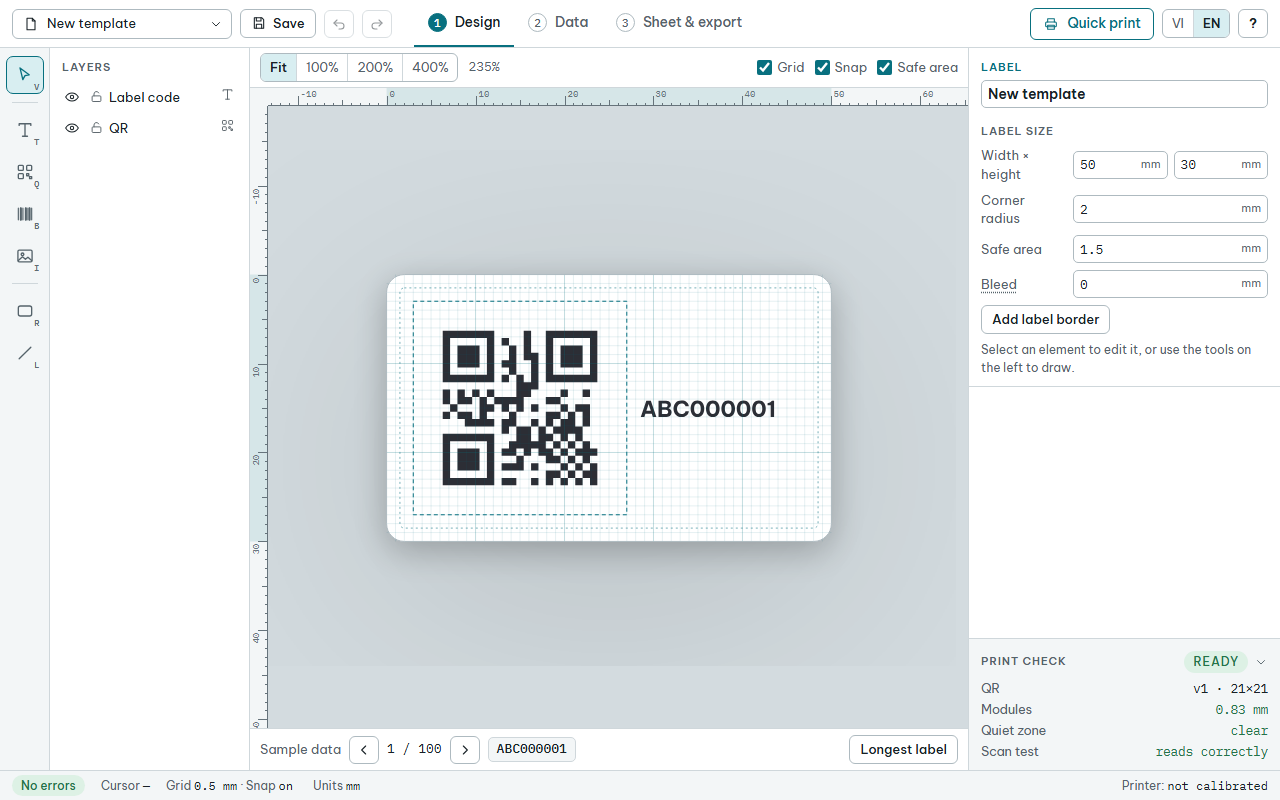
- It opens an empty template called New template: 50 × 30 mm, with one QR code and one line of text.
- The app creates the folder
Documents\Tktemfor your templates. PDF files go toDocuments\Tktem\PDFby default. - The Quick print screen always has a card for the open template, even an unsaved one, so you can try a print right away.
2.3 Language, units, light and dark
- Language: click VI or EN in the top right corner.
- Units: click Units in the bottom bar to switch between mm and inches. Number fields, sizes shown on screen (the Sheet & export screen included) and the numbers in errors and warnings all follow it; in inches, a barcode's X is in mil. Only the Printer calibration dialog always uses mm, because the measuring page is measured with a mm ruler.
- Light and dark: the app follows the light or dark mode of Windows.
The app remembers these choices.
2.4 Uninstalling
Uninstall Tktem like any other app, in Windows Settings → Apps: pick Tktem, click "Uninstall", then click it again to confirm. You can also right-click Tktem in the Start menu and choose "Uninstall".
- The app's settings (language, units, calibrated printers, print history, drafts) are kept inside the app and removed with it.
- The
Documents\Tktemfolder and the templates and PDF files in it are always kept. - A computer that had Tktem installed from a downloaded setup file still has its old settings folder,
%APPDATA%\com.tktem.desktop, or%APPDATA%\com.temqr.appfrom the version before the app was renamed. The version from the Store carries on with the settings in it, but uninstalling does not delete these folders. To start from scratch, delete them yourself after uninstalling.
A version installed from a downloaded setup file is uninstalled in the same place. Its uninstaller has a "Delete the application data" box (not ticked by default): tick it to also delete the app's settings. Click "Uninstall", then "Close". The Documents\Tktem folder is kept here too.
3. Key ideas
| Idea | Meaning |
|---|---|
| Template | A folder that holds the label design together with the images, die-cut PDF and CSV file it uses. Templates live in Documents\Tktem. Copy the folder and you have copied the template. |
| Element | One thing on the label: a QR code, text, an image, a rectangle or a line. |
| Label code | The code that makes each label unique, for example SB000001. It comes from a number range or from a CSV file. |
| Placeholder | A word in curly braces, such as {code} or {seq}. When printing, each label replaces it with its own value. |
| Safe area | A margin inside the cut line. Keep text and borders inside it so that a slightly off cut does not trim them. |
| Bleed | Printing past the cut line, so that a slightly off cut shows no white edge. |
| Quiet zone | The white border around a QR code. The QR standard asks for 4 modules. |
| Module | One small square of a QR code. The smaller the modules, the harder the code is to scan. |
| Print-shop die-cut PDF | A PDF from your print shop showing where the labels go on the sheet. |
| Errors and warnings | Errors stop you from creating the PDF. Warnings let you create it, but are worth a look. |
4. Quick start: your first label in 5 minutes
This example makes 60 × 40 mm labels with codes SB000001 to SB000120, printed on A4 paper.
- Start Tktem. The Design screen shows New template.
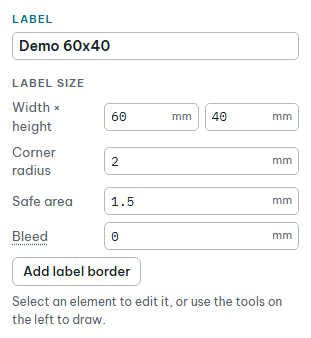
- Nothing is selected yet, so the panel on the right shows Label size.
- In Width × height, type
60and press Enter. Type40in the next field and press Enter. - Click the QR code on the label. Under QR content, the Content field holds
{code}. Type your web address and keep{code}at the end, for examplehttps://example.com/p/{code}, then press Enter. - Drag the QR code and the text where you want them.
- Click Data in the top bar. In Prefix, type
SB. In To, type120. The Data preview shows 120 labels. - Click Sheet & export. The paper is A4 by default. The Layout result box shows how many labels fit on a sheet and how many sheets you need.
- Click Save. The first time, the Save as… box opens. Type a name in the Template field and click Save. A Saved message with the template folder appears.
- Click Create PDF. The Windows save dialog opens in the PDF folder with the file name filled in. Click its save button.
- Wait until the PDF is ready. A Created message appears with an Open folder button.
- Print the PDF at 100 % (see section 9).
5. The Design screen
5.1 Layout
- Top bar:
- the template name button (opens the Template menu);
- Save, and the undo and redo buttons;
- the four screens;
- VI / EN;
- the ? button, which opens the Shortcuts, with the app's version and the Third-party notices button below them (section 12).
- Left: the drawing tools and the Layers panel.
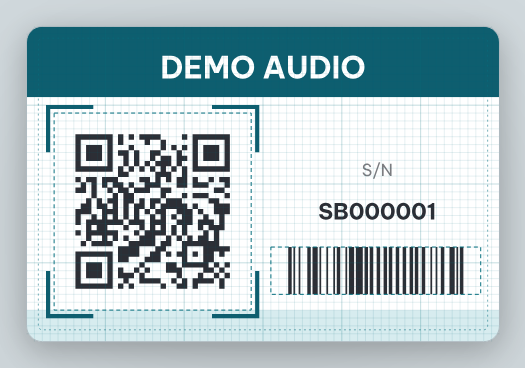
- Centre: the label on a background with rulers.
- Above it: Fit,
100%,200%,400%, and the Grid, Snap and Safe area boxes. - Below it: the Sample data bar.
- Above it: Fit,
- Right: the properties of the selected element, with the Print check panel underneath.
- Bottom bar: the number of errors and warnings (or No errors), the cursor position, grid, snap, units, the template folder, and the printer in use (or not calibrated). With a print shop's die-cut, the printer reads — (print-shop die-cut), because the die-cut PDF is not compensated for any printer (9.3).
5.2 Label size
Click the background right next to the label, or press Esc, to clear the selection. The panel on the right then shows:
| Field | Meaning |
|---|---|
| Width × height | The label size, from 5 to 600 mm. |
| Corner radius | The radius of the label's rounded corners. |
| Safe area | The margin inside the cut line, shown as a dashed line on the label. |
| Bleed | How far to print past the cut line, usually 1–2 mm. Images, colour areas and borders that reach the edge are extended. Labels on the sheet need at least twice that much space between them. |
| Add label border | Adds a frame that follows the label edge. It updates when the label size or corner radius changes. |
The top field of the panel is the template name.
5.3 Drawing and editing elements
Tools (left column, or the shortcut key):
| Tool | Key | How to use it |
|---|---|---|
| Select and move | V | Click to select, drag to move. |
| Text | T | Click on the label to place text. Its content field is selected, ready to type. |
| QR | Q | Drag on the label to draw a QR code, from 5 to 300 mm. |
| Barcode | B | Drag on the label to draw a barcode (see 5.5). |
| Image / logo | I | Choose a PNG or JPG file. The image is placed in the middle of the label. |
| Rectangle | R | Drag to draw. |
| Line | L | Drag to draw. Hold Shift for a horizontal or vertical line. |
Moving and resizing:
- Drag an element to move it. Drag the small squares on its corners and sides to resize it.
- A QR code always stays square.
- Hold Shift to keep proportions, Alt to resize from the centre: the edge you drag follows the pointer, and the opposite edge moves as far the other way.
- Sizes stop at the limits of their number fields, for example 1 to 3000 mm for rectangles and images, 5 to 300 mm for QR codes. With proportions kept, the side you drag stops when the other side reaches its limit, so the shape is never distorted.
- The arrow keys move the selected element by 0.1 mm; with Shift, by 1 mm.
- With Snap on, elements snap to the label's edges and centre, and to other elements' edges and centres; pink guide lines appear. When you drag a square to resize, the edge you drag snaps the same way, except a barcode's X squares (X changes one dot at a time). With Grid on as well, they also snap to the grid, and so does the first point you click when drawing or placing text. Hold Ctrl while dragging, drawing or clicking to place text to switch snapping off for a moment; with Snap off, drawing and text start exactly where you click.
- You can also type exact numbers in the panel on the right. Press Enter to apply a value, Esc to drop what you typed. In a number field, ↑ ↓ step the value up or down. A number beyond the field's limits is pulled back to the limit when applied.
- Double-click text, a QR code or a barcode to edit its content.
Zoom:
- Ctrl + mouse wheel, or the Fit,
100%,200%,400%buttons. - Ctrl+0 fits the label to the window, Ctrl+1 shows it at 100 %.
Aligning: with an element selected, six buttons move it to the left, centre, right, top, middle or bottom of the label. With Safe area on, it is aligned to the edge of the safe area instead.
Buttons at the bottom of the properties panel: Duplicate (Ctrl+D), Bring forward, Send backward, Delete (Delete). After a delete, the message has an Undo button.
Selecting with the keyboard: click the label, then press Tab / Shift+Tab to select one element after another. Past the last one nothing is selected and the panel on the right shows Label size; press Tab again to go into its fields. Esc clears the selection.
5.4 QR codes
Select a QR code to edit it.
Position:
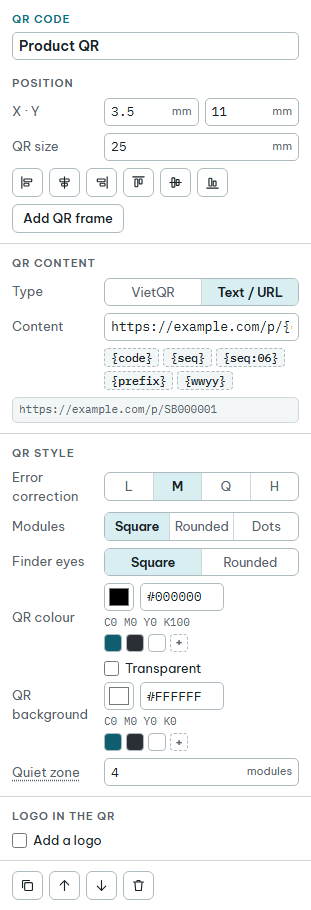
- X · Y is the top left corner.
- QR size includes the quiet zone.
- The Add QR frame button adds a 4-corner frame around the code (see 5.8).
QR content:
- Under Type, choose VietQR for a Vietnamese bank transfer code: pick the Bank and enter the Account number (at most 55 characters). The app builds a standard VietQR string.
- Or choose Text / URL and enter the Content, for example a web address.
- The small buttons such as
{code}and{seq}insert a placeholder at the cursor. - The grey box underneath shows the exact content encoded in the QR of the label being previewed.
QR style:
Field Meaning Error correction L/M/Q/H. A higher level copes better with dirt and damage, but needs more modules. UseHwith a logo.Modules The module shape: Square, Rounded or Dots. Finder eyes The style of the three big squares in the corners: Square or Rounded. QR colour, QR background Colours of the code and of its background. Tick Transparent for no background. Quiet zone The number of white modules around the code. The standard is 4. The dashed line around the QR turns red when something overlaps it. Logo in the QR:
- Tick Add a logo: a file box opens. Choose an image and the logo appears in the middle of the code; cancel and there is no logo.
- Click Choose logo image… to switch to another image.
- Logo size is a percentage of the QR area. Keep it at 15 % or less.
- Adding a logo switches Error correction to
H.
The quiet zone on the label: the dashed line around the QR always lies 4 modules out from the code, whatever the Quiet zone is set to. It turns red when something prints between the dashed line and the code:
- an element above the QR (higher than the QR in the Layers panel), such as text, a line or a label border;
- a dark image or fill under the QR, where the QR background does not cover it. The background covers exactly the QR size, so with a Quiet zone below 4 it does not cover it all; a Transparent background covers nothing.
A QR frame does not count as overlapping, even with a Clearance of 0 mm.
5.5 Barcodes
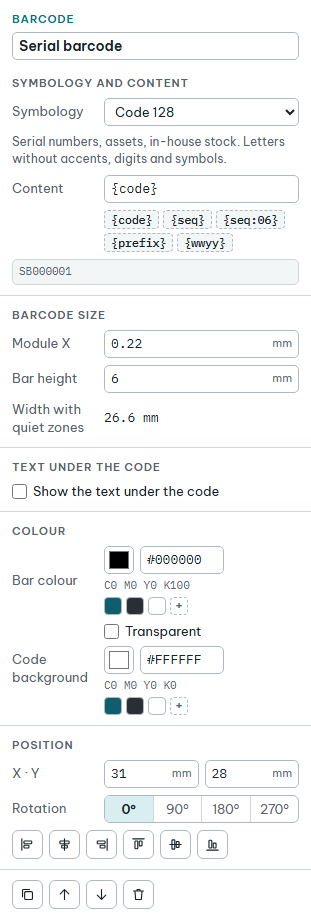
Pick the Barcode tool (key B) and drag on the label. The app makes a Code 128 of {code} and picks X so that the longest code of the batch fills the width you dragged; the rest of the height goes to the bars. X never goes below the Code 128 minimum, so a drag that is too narrow gives a code wider than the drag.
A barcode's box includes the quiet zones on both sides and the line of text under the code. The quiet zones show as a dashed line that turns red when something runs into them or when they leave the label. An element above the code (higher in the Layers panel) that prints into the quiet zones always counts; anything under the code is hidden by the Code background, unless it is Transparent.
Symbology and content:
Symbology, in groups:
Group Symbologies Used for Retail EAN-13, UPC-A, EAN-8 Goods sold at a checkout. Enter 12, 11 or 7 digits and the app adds the check digit; enter all of them and the app checks it. Use only numbers your GS1 member organisation assigned to you: the app checks the structure, not whether you may use the number. Logistics GS1-128 Carton and logistics labels: (AI)value pairs, for example (01)08934567890120(10){code}. The app checks check digits, lengths and dates.In-house Code 128 Serial numbers and assets: letters without accents, digits, symbols. 2D codes DataMatrix, GS1 DataMatrix A square code for small parts. DataMatrix takes accented text. The small text under Symbology says where that symbology is used.
Content works like a QR code's content, with placeholders, for example
893456789{seq:03}.The grey box below shows the exact content of the code, check digit included, for the label on screen. Content that cannot be encoded shows as a red message.
Barcode size:
Field Meaning Module X The width of the narrowest bar, in mm (in mil when you work in inches). The whole code grows with X; it is never stretched freely. Bar height 1D codes only. EAN/UPC must not be cut shorter than the standard asks. Width with quiet zones Read only: the width of the code plus its quiet zones. - The hint under X gives the size as a % of nominal size (EAN/UPC, where 100 % is 0.33 mm). When printing on standard paper (7.1), it also gives the number of dots of the chosen printer if it has a resolution (9.2), for example 4 dots at 300 dpi.
- When X is not a whole number of dots, a Use … button sets the nearest X that is, for example 0.339 mm. The X it suggests is never below the symbology's minimum, nor below 2 dots.
- With a print shop's die-cut, there are no dots and no Use … button: the die-cut PDF is not rounded to dots (9.3).
Text under the code: tick Show the text under the code, then choose the Font and Font size. EAN/UPC put the digits under their groups of bars, as the standard does; other symbologies centre the text under the code.
Colour: Bar colour and Code background; tick Transparent for no background. Print the bars in a dark colour: scanners use a red light, and under it red or orange bars disappear.
Position: X · Y is the top left corner of the box. Rotation 0°, 90°, 180° or 270°.
On the label: drag the squares at the two ends of the code to change X, one dot of the chosen printer at a time (0.01 mm when the printer has no resolution, or with a print shop's die-cut), never below the symbology's minimum (and, on standard paper, never below 2 dots); drag the squares on the other two sides to change the bar height. A 2D code stays square, and every square changes X.
The whole batch: every label gets the same code size, that of the longest code in the batch; shorter codes sit in the middle of the box. The app checks the content of every label in the batch, not only the one on screen.
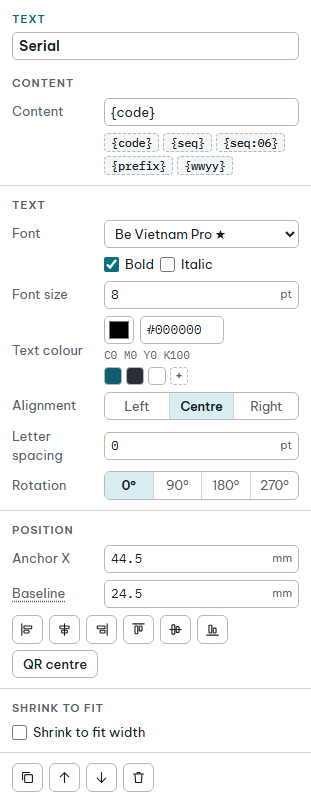
5.6 Text
Select a line of text to edit it. Each text element is one line.
Content: fixed words, placeholders, or both, for example
Batch {wwyy}.Text:
Field Meaning Font Fonts installed on the computer. The font marked ★ comes with the app, so every computer has it. Bold, Italic The type style. Font size In points (pt). Text colour See 5.9. Alignment Left, Centre or Right of the anchor point. Letter spacing Extra space between characters, in pt. Rotation 0°, 90°, 180° or 270°. Position:
- Anchor X is the horizontal point the text is aligned to.
- Baseline is the line the text sits on, shown as a pink dashed line. Positioning by baseline keeps text in place when the font or size changes.
- The QR centre button puts the anchor at the centre of the QR code and centres the text.
Shrink to fit:
- Tick Shrink to fit width and set the Max width.
- The app finds the longest content in the whole batch and shrinks the text on every label by the same amount, so all labels share one font size.
- While text is shrunk, the panel shows the real size, for example Shrunk to 6.5 pt for the whole batch.
5.7 Images and logos
- Click the Image / logo tool (key I) and choose a PNG or JPG file.
- The image is placed in the middle of the label. The panel shows the file name, its size in pixels and its print resolution (DPI). Aim for 300 DPI or more. Set position and size under Position and size.
- Buttons and boxes:
- Change image… swaps the image. If the image file is missing, this button reads Load image….
- Fit to label makes the image cover the whole label, for a background.
- Keep proportions when dragging keeps the image from being distorted, also when you type numbers. A side typed too large or too small stops where the other side reaches the 1–3000 mm limit.
- Lock (not selectable on the canvas) prevents moving it by accident, useful for a background. A locked element can still be selected in the Layers panel.
An image chosen from outside the template folder is copied into the template's assets folder when you save, so moving or deleting the original file does no harm. An image already inside the template folder is used where it is.
For a Print shop CMYK PDF, the app converts PNG and JPEG pictures to CMYK inks like the other colours (5.9). A converted JPEG is no longer JPEG-compressed, so the PDF gets larger; save logos as PNG.
5.8 Rectangles, borders and lines
Rectangles:
Colour:
- Fill sets the fill colour.
- Tick No fill for an outline only.
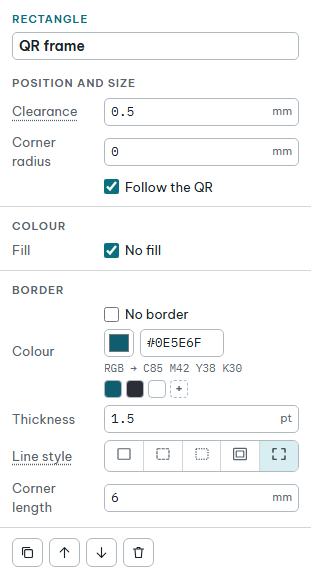
Border:
Field Meaning Colour The border colour. Tick No border to remove it. Thickness In pt. Line style Solid, Dashed, Dotted, Double or Corners. The stroke lies inside the frame. Dashes and dots stretch slightly so every corner gets one. Dash · gap Dashed only: dash and gap length. Gap Dotted and Double: space between dots, or between the two lines. Inner line Double only: thickness of the inner line. Corner length Corners only: length of each corner.
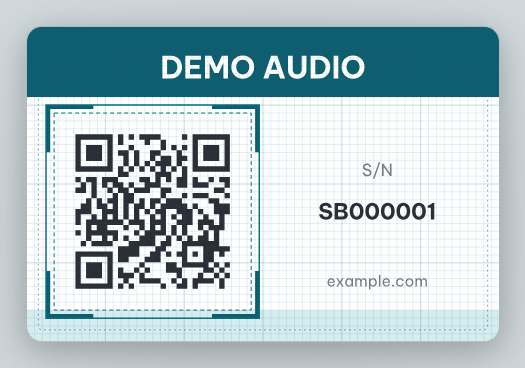
Label borders and QR frames:
- A label border (the Add label border button):
- has Follow the label edge and Inset: the distance from the cut line to the outer edge of the border;
- follows the label when its size changes.
- A QR frame (the Add QR frame button):
- has Follow the QR, Clearance and Corner radius;
- keeps its stroke at least the Clearance away from the quiet zone, rounded corners included, so it never hurts scanning. A large corner radius makes the frame grow outward; a very large one turns it into a circle around the code;
- moves and resizes with the QR.
- Untick Follow the label edge or Follow the QR to turn the frame into an ordinary rectangle that stays where it is.
Lines: under Coordinates, set the Start and End; under Stroke, set the Colour and Thickness. The stroke stops exactly at the start and end points, so a line from one edge of the label to the other is not reported as outside the label; only the thickness spreads out on both sides of the line.
5.9 Colour
The PDF colours section in the Sheet & export step (7.6) chooses how colours go into the PDF, saved with each template:
- Print shop CMYK (default): every colour and picture becomes CMYK inks, as described below. The file name ends in
_CMYK. - Design colours: RGB colours and pictures stay as in the template, CMYK stays CMYK. Use it for office printers or digital presses that convert colours themselves; the printer or print shop converts RGB its own way.
Print shops print with four inks only, C, M, Y and K, so a Print shop CMYK PDF writes every colour as inks:
- A CMYK colour prints exactly as you enter it.
- An RGB colour (what designers usually supply) is converted to CMYK by Tktem when it exports the PDF, for offset printing on coated paper, FOGRA39 (ISO Coated v2, at most 300 % ink in total). The template keeps the original RGB values. RGB greys and black use black ink only, so
#000000becomes K 100. - PNG pictures are converted to CMYK too, transparency kept. A picture with only black and greys (a black logo, a greyscale PNG) prints in black ink only. In a colour picture, black and greys print in four inks as in any photo software, so do not put small black text in a colour picture: make it a text element. RGB JPEGs are converted the same way. CMYK and greyscale JPEGs go in unchanged (a greyscale JPEG prints in black ink).
- The PDF names the FOGRA39 standard, so the print shop knows what the CMYK values were made for. If your print shop uses another standard, ask them for the CMYK values of your key colours and enter them.
- Such a PDF still prints on an office colour printer (the PDF reader converts the colours); for colours closest to the design choose Design colours.
Every colour setting has:
- a Pick colour box that opens a colour picker;
- a HEX colour field, for example
#0E5E6F; - a CMYK button:
- For a CMYK colour it shows the inks, for example
C0 M0 Y0 K100. For an RGB colour it shows the inks a Print shop CMYK PDF prints it with:#006B68shows RGB → C84 M31 Y52 K28; in a template set to Design colours it shows RGB · printer converts. - Click it to open the CMYK (0–100) box and enter exact ink values, for example from your brand guide or your print shop. For an RGB colour the box is filled with the converted inks; click OK to make the colour CMYK.
- For a CMYK colour it shows the inks, for example
- quick swatches: the template's saved colours, black (K 100) and white. The + swatch saves the current colour in the template's swatches with its values unchanged (RGB stays RGB, CMYK stays CMYK). Right-click a saved colour to remove it from the swatches.
While a colour is CMYK, picking a colour or typing a HEX value keeps it CMYK, converted by the same FOGRA39 standard; black and greys use black ink only.
The HEX value of a CMYK colour is only close, except for black and greys in black ink only, which convert back exactly (K 100 is #000000). To reuse the exact inks on another element, save the colour with the + swatch instead of copying the HEX value.
On screen, CMYK colours look almost as they print (the same as Exact print preview): cyan C 100 is less vivid than on a screen, black K 100 is slightly grey like real ink. RGB colours show their RGB values; to see how an RGB colour prints, open Exact print preview.
Use black K 100 for small text, thin lines, QR codes and barcodes:
- Black K 100 prints in one ink, so it stays sharp. A colour of several inks (such as the brand teal above, four inks) prints several times on top of itself, and a slight misregistration blurs it. The Print check panel warns about this.
- In the PDF, text, QR codes, barcodes, lines and borders in black K 100 (RGB black too, in a Print shop CMYK PDF) overprint the background under them, so misregistration shows no white edge. Fill areas and white do not overprint.
- For a deep black over a large area use C60 M40 Y40 K100. A colour with more than 300 % ink in total is reported: thick ink dries slowly and smears.
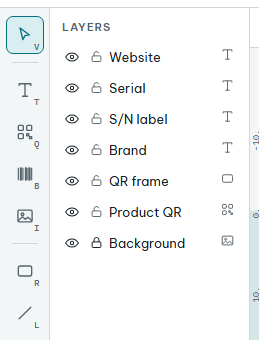
5.10 The Layers panel
- The top row is the topmost layer.
- Click a row to select its element, even a locked one.
- The eye button toggles Hide / Show. A hidden element is not printed and not checked, not even for a misspelled placeholder. The padlock toggles Lock / Unlock.
- Drag a row up or down to change the layer order. The element takes the place of the row you drop it on.
5.11 Previewing with real data
The Sample data bar under the label shows each label of the batch:
- Previous label and Next label (◀ ▶) step through the labels;
- Longest label jumps to the label with the longest content, to check for text overflow and module size.
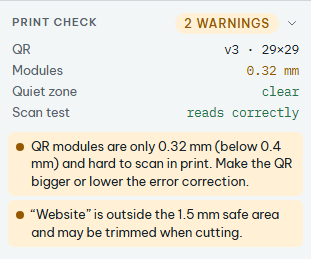
5.12 The Print check panel
The panel in the bottom right corner checks the label while you edit. Its figures are about the selected QR code or barcode; with nothing selected, about the first QR code.
| Row | Meaning |
|---|---|
| QR | The QR version and module count. The whole batch uses one version, so all labels have the same module size. |
| Modules | The size of one module. Aim for 0.4 mm or more. |
| Barcode (EAN-13, Code 128…) | Module X, and when printing on standard paper, the number of dots of the chosen printer if it has a resolution, for example X 0.339 mm · 4 dots at 300 dpi. |
| Width with quiet zones | The width of the barcode, quiet zones included. |
| Quiet zone | clear, or overlapped when an image or another element runs into the code's quiet zone. |
| Scan test | The app draws the label at 300 dpi and tries to read the QR code or barcode: reads correctly or failed (running… while it tries). A GS1 code must also read as GS1. |
- Below is the list of errors and warnings. Click a row to select the element concerned, or to open the screen concerned.
- When there is nothing to report, the panel says Ready.
- Click the Print check title to collapse or expand the panel.
What each message means and how to fix it: see section 11.
6. The Data screen
6.1 Number range
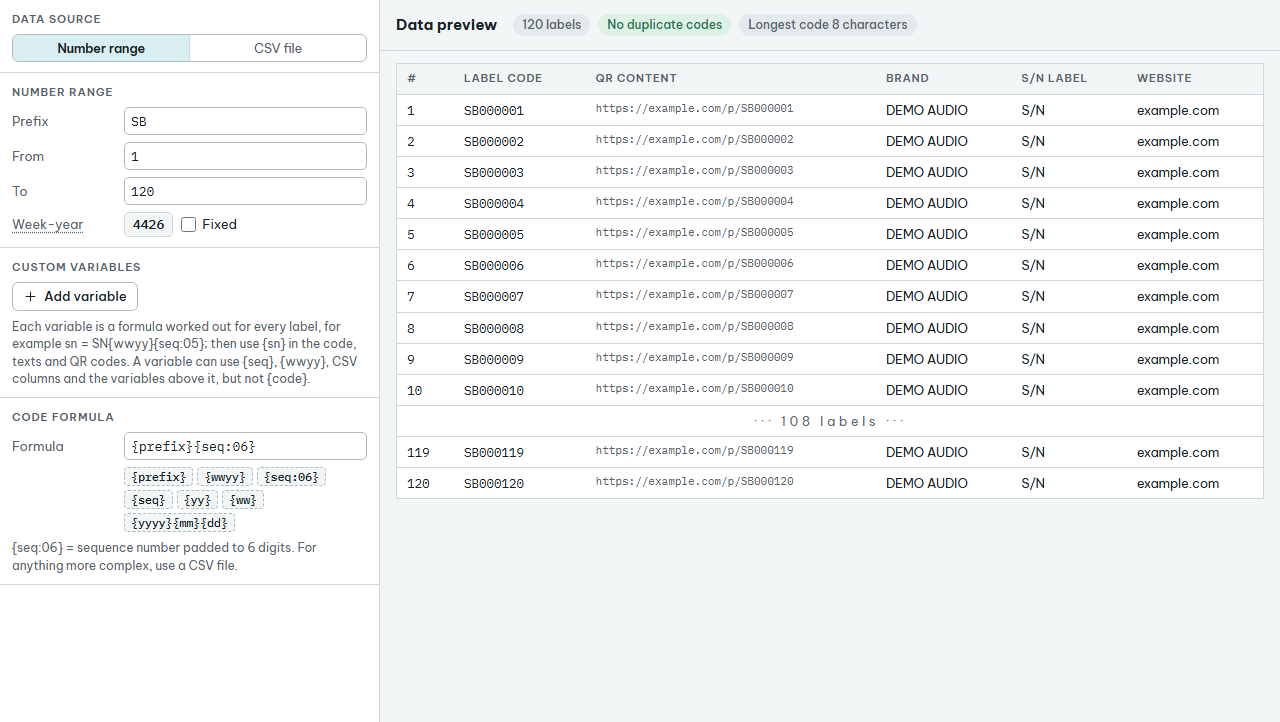
Under Data source, choose Number range, then fill in:
| Field | Meaning |
|---|---|
| Prefix | The letters at the start of the code, for example SB. |
| From, To | The first and last sequence number. Each number is one label. |
| Week-year | ISO week plus the last two digits of the year, for example 4326. By default the app uses the current week. Tick Fixed to keep a value of your own and edit it; a fixed value needs 4 digits with a week from 01 to 53, otherwise the app reports an error and makes no PDF. |
6.2 Code formula
The Formula field decides each label's code. For example {prefix}{seq:06} gives SB000001, SB000002, … The buttons underneath insert placeholders:
| Placeholder | Value |
|---|---|
{seq} |
The sequence number: 1, 2, 3, … |
{seq:06} |
The sequence number padded to 6 digits: 000001. Change the 6 for another length, up to 20. |
{prefix} |
The Prefix. |
{wwyy} |
The Week-year, for example 4326. |
{ww}, {yy} |
Week and two-digit year, taken from the Week-year. |
{yyyy}{mm}{dd} |
The date the PDF is created, for example 20261022. |
{column name} |
The value of that column in the CSV file, for example {model}. |
{variable name} |
The value of the custom variable of that name, see 6.3. |
{code} |
The label code. Use it in QR content and text. |
A misspelled placeholder is reported in the preview and stops the PDF from being created. For anything more complex, such as calculations or lookups, prepare the data in Excel or a script and use a CSV file.
6.3 Custom variables
A custom variable is a named formula, worked out for every label. Set it once and use it in several places: the label code, texts and QR content.
For example, a label needs the text S/N: SN432600001 and a QR code holding http://test.io?ref=SN432600001.
- Under Custom variables, click Add variable. A new row appears: the variable name on the left, its formula on the right.
- Rename it to
snand type the formulaSN{wwyy}{seq:05}. - In Design, set the text to
S/N: {sn}and the QR content tohttp://test.io?ref={sn}. A{sn}button is also offered under the content fields.
Rules:
- A variable name has only letters without accents, digits and
_, and does not start with a digit. It cannot repeat another variable or a built-in name such asseq,code,wwyy. An invalid name gets a red border and the app keeps the old one. - A variable can use
{seq},{wwyy}, the date, CSV columns and the variables above it. It cannot use{code}, but the code Formula can use variables, for example{sn}. - When the CSV file has a column with the same name as a variable, the app takes the column.
- Click the bin at the end of a row to remove the variable.
- The preview table gets a column for each variable so you can check the result.
6.4 CSV files
Use a CSV file when the codes are not a simple number range, for example an existing list of serial numbers.
Preparing the file:
- In Excel, choose Save As and the type "CSV UTF-8". A plain CSV file (not UTF-8) breaks accented letters; the app says so right under the file name when it meets one.
- The first row holds the column names. Each following row is one label.
- Columns may be separated by commas, semicolons or tabs.
- Quotes are read as Excel does: a cell that starts with
"runs to the closing", so it can hold commas and line breaks; a"inside a cell is an ordinary character, as inSpeaker 12" black. If a cell opens a"and never closes it, the app gives the line number.
Choosing the file:
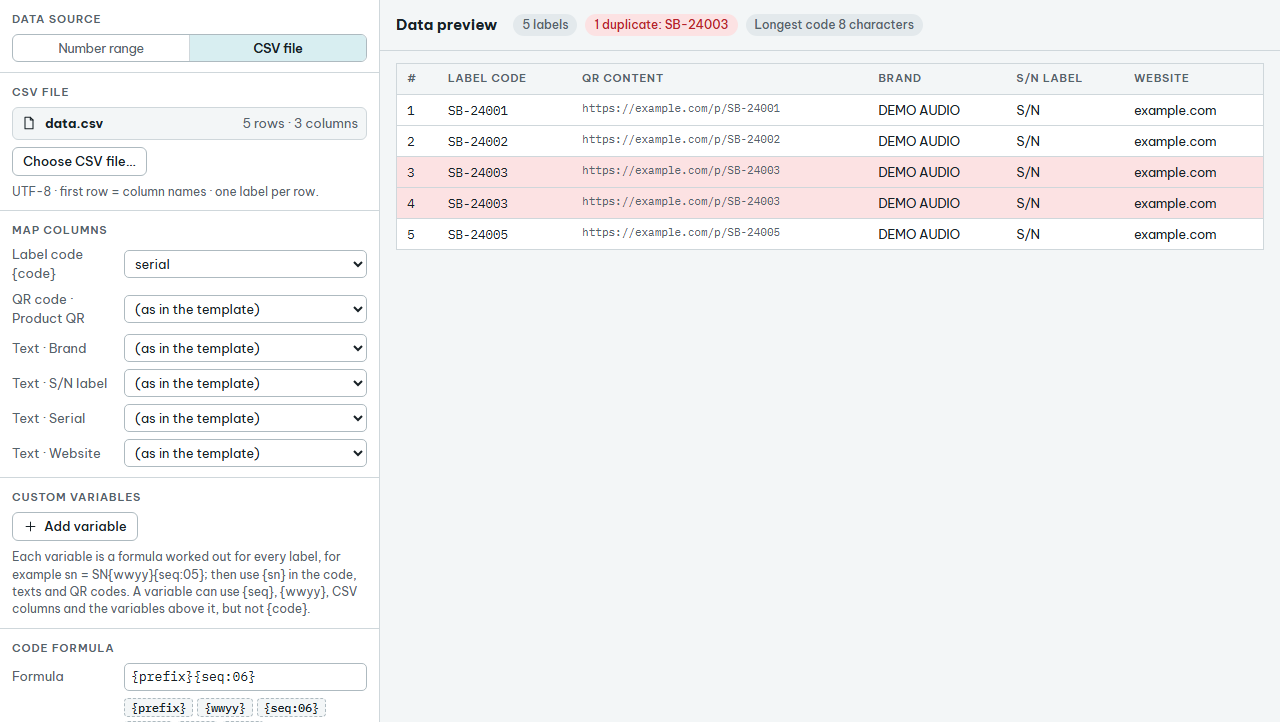
- Under Data source, choose CSV file.
- Click Choose CSV file…. The app shows how many rows and columns the file has.
- Under Map columns:
- Label code
{code}: pick the column that holds the codes, or (use the formula) to build the codes with the formula. - Each QR code, barcode and line of text: pick a column to take its content from, or (as in the template) to keep the designed content.
- Label code
- Column names become placeholders, for example the column
modelbecomes{model}, usable in text and QR content.
When you choose another file that lacks a mapped column, the element mapped to it goes back to (as in the template), and Label code takes the file's first column. Each time you change the file, check Map columns again.
When you open a template whose CSV file no longer has a mapped column (for example the column serial was renamed Serial Number), the app keeps the mapping and never takes another column instead. That box in Map columns still shows the old column name, and the app reports The CSV file has no column “serial”, which the template needs. and cannot print yet. Fix it in one of two ways: pick the right column again in Map columns; or fix the CSV file so it has that column again, then click Choose CSV file… and choose the file again.
A CSV file outside the template folder is copied into the template's assets folder when you save; the template uses that copy. A file already inside the template folder is used where it is. If you change the original file after choosing it, click Choose CSV file… and choose it again.
When the template's CSV file is no longer where it was (deleted, renamed, or the template was copied to another computer without it), the file box reads No CSV file chosen with a red line below it, for example: CSV “data.csv” not found. Click Choose CSV file… and choose the file again.
6.5 Data preview
- The table on the right shows the first 10 and the last 2 labels.
- Above it are tags: the number of labels, No duplicate codes or the number of duplicates, empty rows, and the length of the longest code.
- With no labels at all (no CSV file chosen, the file is gone, or To is below From), a red tag replaces No duplicate codes: No label data yet. Enter a number range or choose a CSV file in the Data step.
- Each mapped column the CSV file lacks adds a red tag, for example: The CSV file has no column “serial”, which the template needs. See 6.4.
- Duplicate codes are highlighted in red. Duplicates and rows without a code are errors: fix the data before printing.
- Each barcode has a column with the exact content of the code, check digit included. A red cell is content that cannot be encoded.
7. The Sheet & export screen
7.1 Standard paper
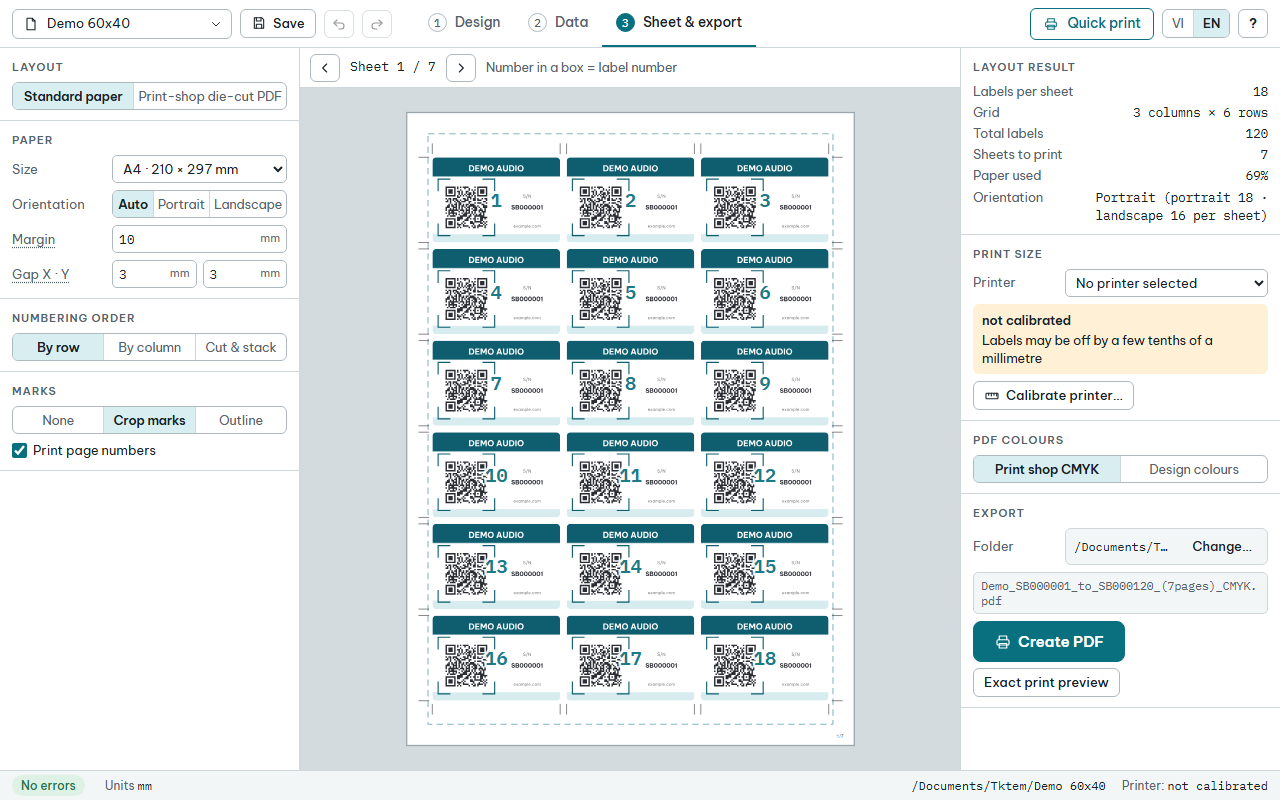
Under Layout, choose Standard paper:
| Field | Meaning |
|---|---|
| Size | A5, A4, A3, SRA3, Letter, Legal. Choose Custom… to type your own size (50–3000 mm); the app then reminds you, for example: The paper tray must hold 480.0 × 330.0 mm. |
| Orientation | Auto takes the orientation that fits more labels; when neither fits, the one the label misses by less. Or choose Portrait or Landscape. |
| Margin | Empty space on all four sides of the paper. Keep it larger than the area your printer cannot reach, usually 3–5 mm. |
| Gap X · Y | Space between two neighbouring labels, across and down. |
The labels are laid out in a grid, centred on the sheet.
7.2 A print shop's die-cut PDF
When your print shop sends a die-cut PDF showing where the labels go:
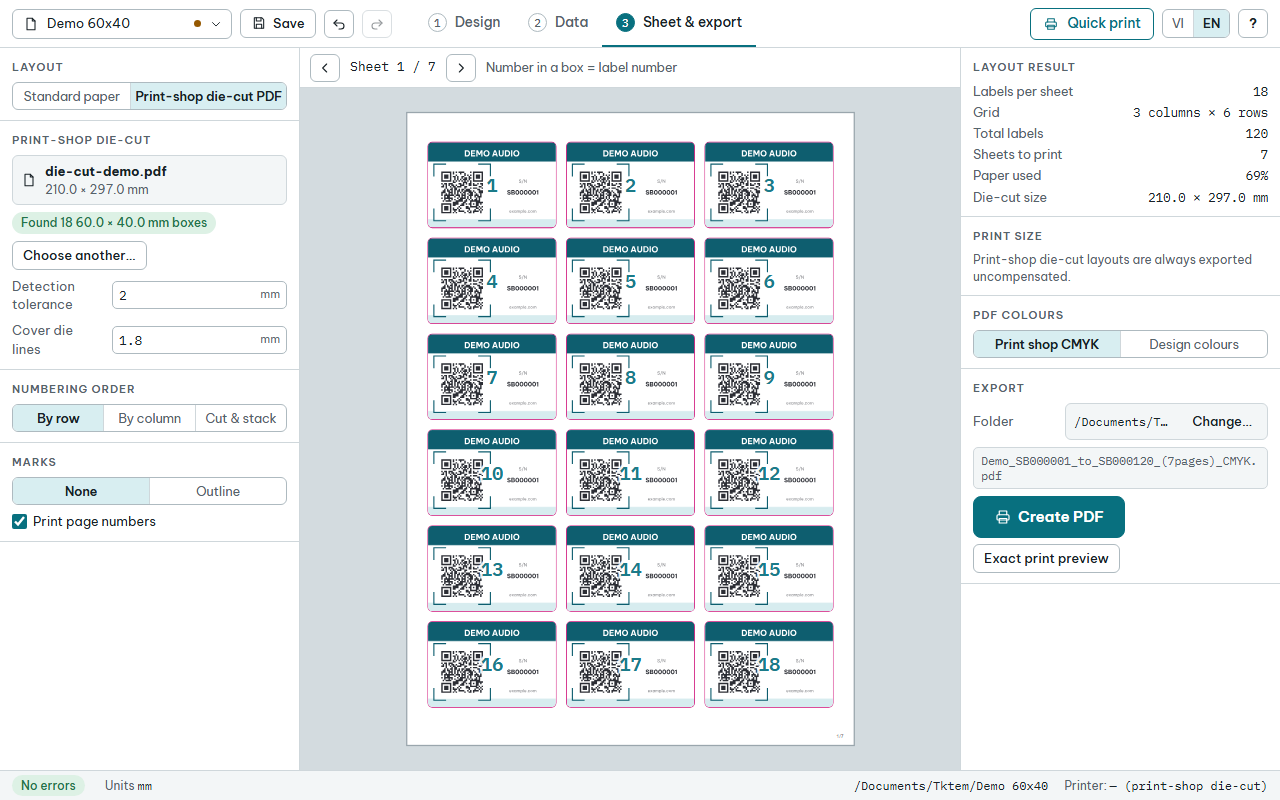
- Under Layout, choose Print-shop die-cut PDF.
- Click Choose die-cut PDF… and choose the print shop's file.
- The app reads the first page, shows Reading the die-cut…, then reports the boxes it found, for example Found 18 60.0 × 40.0 mm boxes.
- Each label is placed in the middle of a box, at its designed size.
Until a die-cut file is chosen, the preview is a blank A4 sheet, the app reports No die-cut file chosen. and the PDF cannot be created yet. Click that error in the Print check panel to go straight to the Choose die-cut PDF… button.
As with images, a die-cut chosen from outside the template folder is copied into the template's assets folder when you save; a die-cut already inside the template folder is used where it is.
A label with a Corner radius above 0 only takes rounded boxes from the die-cut. A square-cornered label (Corner radius 0) takes square boxes too.
When the die-cut file cannot be read, the reason shows in red under the file name, in the Print check panel and under the Create PDF button, and no PDF can be created yet:
- A locked die-cut file (password-protected or encrypted): the app says The die-cut file is locked: ask the print shop for an unlocked file, or print it to PDF and choose the new file. The app cannot place a locked file as the background of the PDF. The easiest way is to ask the print shop for an unlocked file. To print it to PDF yourself: open the file in a PDF reader, print it to PDF at 100 % on a paper size equal to the die-cut's size, then click Choose another… and choose the new file; the die-cut size shown under the file name must match the print shop's die-cut.
- A damaged file, not a PDF, or no longer on this computer: the app says Could not read the die-cut PDF: … with the reason. Click Choose another… and choose the file again, or ask the print shop to send it again.
Settings:
- Detection tolerance: a box in the die-cut counts when its size differs from the label by no more than this amount.
- Cover die lines: the die-cut prints as the background of the PDF; the app paints white around each box, this far past its edge, so the die lines do not print.
Print-shop die-cut layouts are always exported uncompensated. The print shop calibrates its own printer. To use another file, click Choose another….
7.3 Numbering order and marks
Numbering order:
Option Order By row Left to right, row by row. By column Top to bottom, column by column. Cut & stack After guillotining the whole pile, every stack is a continuous run of numbers. Marks:
- None or Outline.
- With standard paper there are also Crop marks.
Tick Print page numbers to print the page number, for example 3/10, in the bottom-right corner of the sheet.
- The page number prints in grey, at 7 pt, in the Be Vietnam Pro font that comes with the app. The font is inside the PDF, so every printer prints it the same.
- The sheet preview shows it in the same place, at the same size and in the same font as the PDF.
- In that corner, labels, crop marks and die-cut boxes must stay at least 6.6 mm above the bottom edge of the sheet, so the number is 1 mm away from them. The more sheets, the longer the number and the wider the corner it needs.
- When that corner is too close to a label, a crop mark or a die-cut box, the PDF leaves the number out and the Print check panel warns.
7.4 Sheet preview
- The middle of the screen shows the sheet. Previous sheet / Next sheet step through the sheets. Above it is the sheet shown, for example Sheet 2 / 5; with no labels yet it reads Sheet 1 / 1, the sheet being drawn.
- Number in a box = label number: the big number on each label is for the preview only and is not printed.
- The Layout result box shows labels per sheet, the grid, total labels, sheets to print, the share of paper used, and the Orientation (standard paper) or the Die-cut size (die-cut).
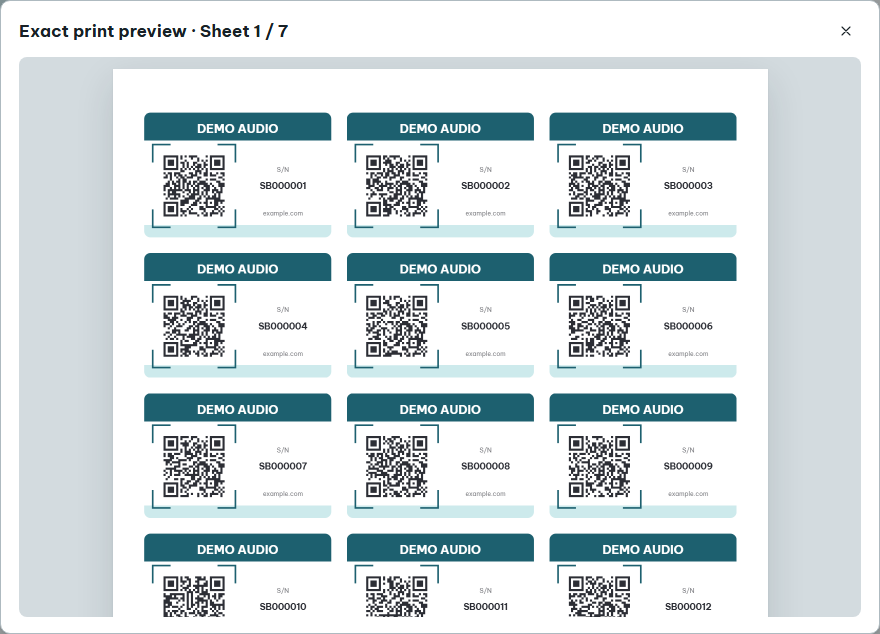
7.5 Exact print preview
Click Exact print preview to see the real PDF page of the current sheet, exactly as it will print. Colours look almost as they print too, in the chosen PDF colours: with Print shop CMYK, RGB colours and pictures are already converted to CMYK (5.9).
7.6 Creating the PDF
- Under PDF colours, choose Print shop CMYK (the file name ends in
_CMYK) or Design colours for office printers, see 5.9. The choice is saved with the template. - Under Export:
- Folder is where the PDF goes; click Change… to choose another folder. This folder is shared by all templates. Only for a template that has a PDF folder of its own, Change… changes that template's folder, as a change to the template: it can be undone and the template needs saving;
- the line below it is the file name.
- Click Create PDF. The Windows save dialog opens in that folder with the file name filled in. Click its save button, or pick another place first.
- The Creating PDF… box shows progress sheet by sheet. Click Cancel to stop; the app reports: Cancelled. No file was written.
- When it is done, a Created message appears with an Open folder button.
Create PDF is greyed out when:
- there is no data;
- the template has errors: they are listed in red right under the button;
- the app is still reading the die-cut.
One PDF can hold up to 200 000 labels. Split bigger runs into several PDFs.
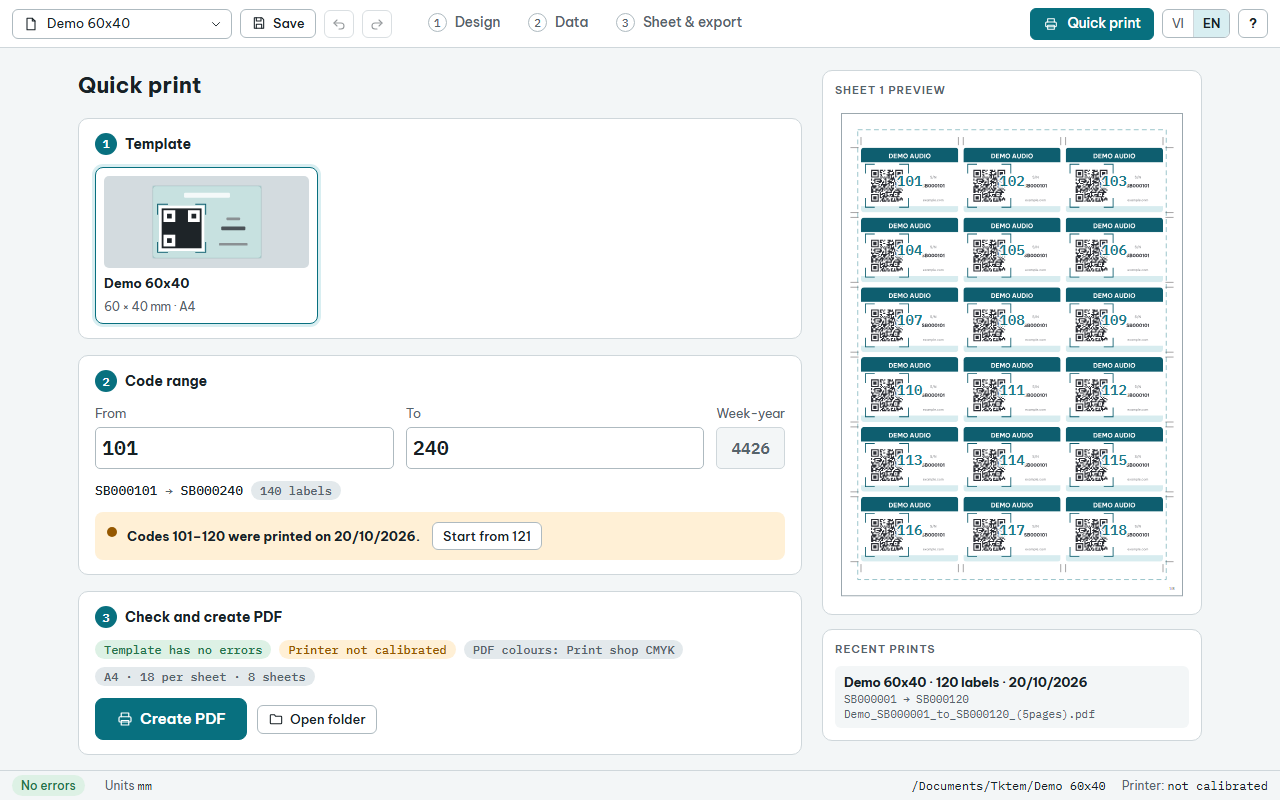
8. Quick print
The Quick print screen is for everyday printing. The design cannot be changed here. The code range typed here and a CSV file chosen here are for this print only: the template does not change and needs no saving.
- Template: click the card of the template to print. The cards are the templates in the templates folder and the recently opened ones. The open template always has a card and is already selected; an unsaved template comes first and prints just as you see it.
- Code range:
- Type From and To. The app fills in the range that follows the highest number printed with this template, with as many labels as that print. Reprinting an older range does not move the filled-in range back.
- A new range shows This range has not been printed yet.
- A range that overlaps an earlier print shows a yellow warning, for example: Codes 101–120 were printed on 20/10/2026. Click Start from … to jump to the next unprinted number.
- For a template that uses a CSV file, the app prints the template's CSV file. To print another file, click Choose CSV file…: that file is for this print only, and the template keeps its own file and its Map columns. That file must have every column the template maps, with the same names; if one is missing, the app reports an error naming the column and cannot print yet. Going to another screen or opening another template brings back the template's file.
- Check and create PDF:
- Tags show whether the template has errors (Template has no errors), whether the printer is calibrated (Printer not calibrated), the template's PDF colours, labels per sheet and the number of sheets.
- Errors that stop printing are listed in red.
- Click Create PDF. Open folder opens the folder the PDF will go to, as the Folder box in 7.6.
On the right are the Sheet 1 preview and Recent prints (the last six prints; at first it says: Nothing printed yet.).
9. Printing at true size
9.1 Print the PDF at 100 %
- In the print dialog of your PDF reader, choose Actual size or 100 %. Do not choose Fit.
- The paper in the tray must match the paper size of the PDF.
9.2 Printer calibration
Every printer is slightly off. Calibrate each printer once, so that labels print at their true size (within about ±0.2 mm).
On Sheet & export, choose Standard paper and the paper Size you will print on, then click Calibrate printer… in the Print size box.
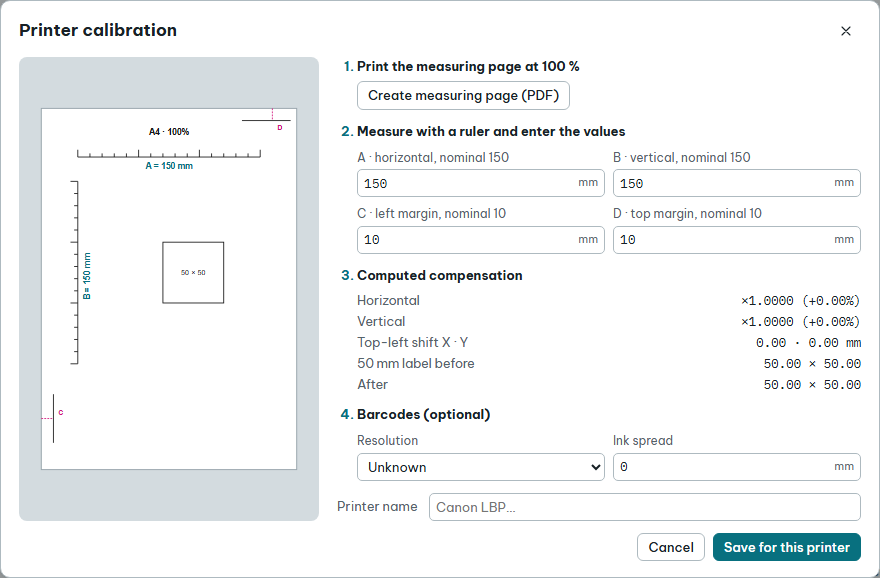
Print the measuring page at 100 %:
- Click Create measuring page (PDF) and save the file. The measuring page is Letter when the Size is Letter or Legal, and A4 for every other size. The picture on the left of the dialog shows its paper size.
- Print it on paper of the same size (Letter or A4) at 100 %. The margins C and D depend on the paper in the tray, so measure on the paper you will print on.
Measure with a ruler and enter the values:
Field What to measure A The length of the horizontal line with tick marks (nominal 150 mm). B The length of the vertical line with tick marks (nominal 150 mm). C From the left edge of the paper to the short vertical line near it (nominal 10 mm). D From the top edge of the paper to the short horizontal line near it (nominal 10 mm). The app accepts A and B from 140 to 160 mm and C and D from 0 to 20 mm. A typing mistake turns the field red and blocks saving. These fields are always in mm, even when the app is set to inches.
Computed compensation shows:
- Horizontal, Vertical: how much the app enlarges or shrinks the page to make up for A and B.
- Top-left shift X · Y: how far the app moves the top-left corner of the page to make up for C and D. A positive X moves it right, a positive Y moves it down. For example, C measured as 10.3 mm (the printer is 0.3 mm to the right) gives an X of −0.3 mm; D measured as 9.8 mm (the printer is 0.2 mm too high) gives a Y of 0.2 mm. When A or B is not 150, the shift includes the enlarging or shrinking, so it can be other than 0 even when C and D are exactly 10.
- 50 mm label before and After: the size of a 50 mm label printed on this printer without and with compensation.
Barcodes (optional):
- The printer's Resolution: 203, 300, 600 or 1200 dpi, or Unknown. With a resolution, when printing on standard paper, the app suggests an X of whole dots, warns about an X between dots, and makes every bar whole dots in the PDF.
- Ink spread: printed bars usually come out thicker than designed. Print a test, measure how much thicker, and enter it; the app makes the bars that much thinner. Leave 0 until you have measured.
Type the Printer name and click Save for this printer.
After that:
- The Printer field in the Print size box selects the printer you calibrated. The box shows its name and the compensation, for example: Horizontal +0.12% · vertical −0.05% · tolerance ±0.2 mm. With a resolution it also shows, for example: 300 dpi · ink spread 0.02 mm.
- Every PDF you create is compensated for that printer, and its file name gets the printer's name.
- A sheet lying sideways (Orientation is Landscape in Layout result): the printer turns the page when printing, so the app compensates the page's width by B and its height by A, and does not shift it by C and D. Labels keep their true size; the whole sheet can be off by as much as the printer's margins are.
- Such a PDF is only right for that printer. To send a file to another print shop, choose No printer selected for an uncompensated PDF.
9.3 With a print shop's die-cut
Die-cut layouts never use printer compensation, nor the barcode ink spread, and do not make bars whole dots of the chosen printer, so there are no suggestions or warnings about X in that printer's dots either; the squares at the two ends of a barcode change X 0.01 mm at a time. The print shop calibrates its own printer.
10. Saving and managing templates
10.1 Saving and opening
Click the template name button in the top left corner to open the menu:
| Item | What it does |
|---|---|
| New template | Starts an empty template. |
| Open template… | Go to the template's folder and choose the profile.json file in it. |
| Save (Ctrl+S) | Saves the template. Pressing Ctrl+S while typing in a field also saves what you just typed. |
| Save as… (Ctrl+Shift+S) | Saves as a new template: type the name in Template and choose the Folder with Change…. The app copies every image, die-cut, CSV file and the template's own fonts along. |
| Recent templates | Templates you opened recently. |
| Open templates folder | Opens Documents\Tktem in File Explorer. |
- A template with unsaved changes has a dot ● next to its name. An action that leaves the template as it was, such as dragging an element and dropping it back where it was, clicking the option already chosen or typing the same value again, adds no ● and no undo step.
- Each template is a folder named after the template, without accents: a template called "Tem đầu tiên" lives in the folder
Tem dau tien.
10.2 Closing with unsaved changes, drafts
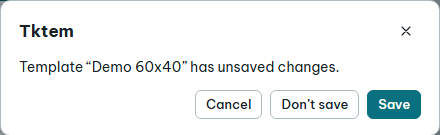
When you close the app, open another template or start a new one while there are unsaved changes, the app says, for example: Template “Demo 60x40” has unsaved changes. Choose Cancel, Don’t save or Save.
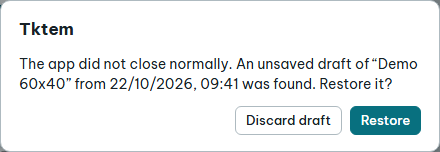
The app keeps a draft 3 seconds after every change. If the app or the computer stops suddenly, the next start asks whether to restore it:
- Restore reopens the draft. The template stays unsaved.
- Discard draft deletes the draft.
- The box only closes with one of these two buttons.
Files chosen from outside the template folder since the last save (images, die-cut, CSV file) are not in the draft. After restoring, choose them again.
10.3 Copying a template to another computer
- On the old computer, click Open templates folder and copy the template's whole folder.
- On the new computer, paste it into
Documents\Tktem.
The template folder already holds its images, die-cut PDF and CSV file. Fonts must be installed on the new computer, except fonts placed in the template's assets\fonts folder (see 10.4).
A template only reads files inside its own folder. A template that points to a file somewhere else still opens, but the app does not read that file and shows an error (section 11). Choose the file again to copy it into the template folder.
10.4 Fonts
- The Font list holds the fonts installed in Windows and Be Vietnam Pro (marked ★), which comes with the app.
- A font you install in Windows shows up after you restart Tktem.
- When a template uses a font the computer does not have, the app shows a warning and uses Be Vietnam Pro instead.
- A font that does not allow embedding in a PDF is an error: choose another font.
- A template's own fonts: put the font files (.ttf, .otf, .ttc) in the
assets\fontsfolder inside the template folder. They show in the Font list when the template is open, and travel with the template to another computer, even one where the font is not installed.
11. Errors and warnings
Errors block Create PDF. Warnings still let you create the PDF. The … marks where the app fills in an element name or a number.
In warnings about a minimum or a maximum (modules, strokes, X, contrast, DPI, bleed gap, GS1-128 width), the number is rounded away from the limit, so it always reads clearly below or above it: a 0.398 mm module shows as 0.39 mm, below the 0.4 mm minimum. A value exactly at the limit gives no warning.
The numbers in the messages follow the chosen unit: mm or inches, a barcode's X in mil when working in inches, and stroke thickness always in pt, like the Thickness field. The table below gives the examples in mm.
| Message | Kind | What to do |
|---|---|---|
| No label data yet. Enter a number range or choose a CSV file in the Data step. | Error | Fill in From / To, or choose a CSV file. |
| The formula has invalid placeholders: … | Error | Fix the Formula, or the QR content or text: use the placeholders in 6.2, CSV column names or a custom variable defined above it (6.3). Hidden elements are not checked. |
| … duplicate codes, for example …. Fix the data before printing. | Error | Fix the CSV file, or add {seq} to the formula. |
| … rows have no code. | Error | Fill in the codes of the empty rows in the CSV file. |
| The pinned week “…” is not valid: it needs 4 digits, the week 01–53 then the last 2 digits of the year, for example 4326. | Error | Fix the Week-year field in the Data screen, or untick Fixed to use the current week. |
| More than … labels in one export; the last … were left out. Split the run into several prints. | Error | Split the run into several prints of at most 200 000 labels. |
| The CSV file has a quote opened on line … that never closes: the rest of the file was read as one cell. Fix that line and choose the file again. | Error | Open the file in Notepad, on that line add the closing " or remove the opening one, save, then click Choose CSV file…. |
| The CSV file is not UTF-8, so accented letters are broken. In Excel use Save As → “CSV UTF-8” and choose the file again. | Warning | Do as the message says. Notepad can do it too: Save As, then pick UTF-8 under Encoding. |
| The CSV file has no column “…”, which the template needs. | Error | The template maps the label code or an element to this column, but the CSV file lacks it (the column was renamed, or it is another file). Click the error to open the Data screen, then pick the right column again in Map columns; or fix the CSV file so it has that column and choose the file again (6.4). Columns cannot be mapped in Quick print: choose a file that has them all. The error about rows without a code that comes with it goes away once the column is mapped. |
| No die-cut file chosen. | Error | Print-shop die-cut PDF is chosen but there is no die-cut file. Click the error to go to the Choose die-cut PDF… button and choose the print shop's file (7.2), or go back to Standard paper. |
| No box in the die-cut PDF matches the label size. | Error | Check that the label size matches the boxes of the die-cut; raise the Detection tolerance. The app reads the first page only. A rounded label only takes rounded boxes; a label with a Corner radius of 0 takes square boxes too. |
| Could not read the die-cut PDF: … | Error | The die-cut file is damaged, not a PDF, or no longer where it was (for example a template copied to another computer without its die-cut file). Click Choose another… and choose the file again, or ask the print shop to send it again (7.2). |
| The die-cut file is locked: ask the print shop for an unlocked file, or print it to PDF and choose the new file. | Error | Ask the print shop for an unlocked file, or print the file to PDF at the die-cut's size and click Choose another… (7.2). |
| The … × … mm label does not fit the … × … mm printable area (paper less margins). | Error | Choose a bigger Size, change the Orientation, or reduce the Margin. The gaps between labels do not cause this error. |
| There is no room for the page number in the bottom-right corner of the sheet, so the PDF leaves it out. | Warning | In that corner, labels, crop marks and die-cut boxes must stay at least 6.6 mm above the bottom edge of the sheet (7.3). Raise the bottom or right Margin so the labels and crop marks move away from the corner; with a print shop's die-cut, lower Cover die lines. If you do not need page numbers, untick Print page numbers. |
| The die-cut boxes differ from the label size by … mm. | Warning | Set the label's Width × height to match the die-cut, or check with the print shop. |
| The die-cut PDF page is rotated …°, so labels may print the wrong way round. Export the layout again without rotation, then choose it again. | Warning | The app places the die-cut and the labels on the page as stored in the file, not turned, so the sheet lies another way than when you open the die-cut in a PDF reader. Ask the print shop for a die-cut whose page is not rotated, then click Choose another…. Check with Exact print preview before printing. |
| “…” extends beyond the label. | Error | Drag the element inside the label. |
| “…”: the content is too long for a QR code. Shorten it or lower the error correction. | Error | Shorten the QR content or choose a lower Error correction. |
| “…”: the VietQR account number is … characters long, at most … (“…”). | Error | Shorten the Account number, or the label code if the account is {code}. The VietQR standard cannot hold a longer account; that label's QR stays empty. |
| QR modules are only … mm (below … mm) and hard to scan in print. Make the QR bigger or lower the error correction. | Warning | Increase the QR size, shorten the content, or lower the Error correction. |
| The logo covers …% of the QR (above …%) and may stop it scanning. Make the logo smaller. | Warning | Reduce the Logo size to 15 % or less. |
| A QR with a logo should use error correction H. | Warning | Set Error correction to H. |
| The QR colour has low contrast with its background (…:1). Use a dark colour on a light background. | Warning | Choose a darker QR colour or a lighter QR background. |
| The background or another element overlaps the 4-module white zone around the QR. | Warning | Move the element outside the red dashed line around the QR. For a dark background image or fill under the QR: untick Transparent under QR background and set the Quiet zone to 4, so the QR background covers the whole quiet zone (5.4). |
| The scan test could not read the QR at 300 dpi. Shrink the logo, change the module style or enlarge the QR. | Error | Follow the advice in the message, then check the Scan test row again. |
| “…” is outside the … mm safe area and may be trimmed when cutting. | Warning | Move the text inside the dashed safe area line. |
| “…” overlaps …. | Warning | Move the text off the QR code. |
| “…” is outside the … mm safe area: a slightly off cut makes the border look uneven. | Warning | Move the border inside the safe area, or use Bleed so the border runs past the cut line. |
| “…” has a … pt stroke (below … pt) that printers may break up. | Warning | Increase the Thickness. |
| “…”: colour … prints as several inks on top of each other, so a slight misregistration blurs it. Small text, thin lines, QR codes and barcodes should use one ink, such as black K100. | Warning | Click the black (K 100) swatch under the colour, or enter a one-ink CMYK value. Text from 12 pt and lines from 1 pt are not reported. For a brand colour, ask your print shop for its CMYK values. See 5.9. |
| “…”: colour … has …% ink in total, above …%: thick ink dries slowly and smears. For a deep black use C60 M40 Y40 K100. | Warning | Lower the inks in the CMYK (0–100) box. |
| “…” reaches the cut line but cannot bleed (it touches only some sides, or is dotted). Move it inward or let it follow the label edge. | Warning | Move the element inward, or use Add label border. |
| The space between labels only allows … mm of bleed; it needs at least … mm. | Warning | Increase the Gap X · Y, or reduce the Bleed. |
| The font of “…” lacks characters: … | Warning | Choose a font that has those characters, for example Be Vietnam Pro. |
| The font “…” is not installed on this computer; using …. | Warning | Install the font in Windows and restart Tktem, or choose another font. |
| The font … does not allow embedding in a PDF. Choose another font. | Error | Choose another font. |
| Image “…” not found. | Error | Choose the image again with Change image… or Choose logo image…. |
| The file “…” is outside the template folder, so it was not read. Choose it again to copy it into the template folder. | Error | A template only reads files inside its own folder (10.3). Click the error to go to the right place, then choose the file again: an image with Load image…, a logo with Choose logo image…, a CSV file with Choose CSV file…, a die-cut with Choose another…. When you save, the app copies the file into the template folder. |
| “…” prints at only … DPI (needs … or more). | Warning | Use an image with more pixels, or make it smaller on the label. |
| “…” is distorted by …% compared with the original image. | Warning | Tick Keep proportions when dragging and resize the image again. |
| “…” carries a rotation flag (usually a phone photo), so it prints sideways or mirrored, as shown. Rotate it in a photo editor, save it, then choose it again. | Warning | Rotate the picture in a photo viewer, save it, then click Change image…. |
| “…” has no content. | Error | Enter the barcode's Content. |
| “…” needs … digits, or … digits with the check digit (label “…”). | Error | EAN-13 takes 12 or 13 digits, UPC-A 11 or 12, EAN-8 7 or 8, digits only. |
| “…”: wrong check digit in “…”; it should be …. | Error | Fix the last digit as the app suggests, or leave it out and let the app add it. |
| “…”: Code 128 cannot encode … (label “…”). Use a QR code or DataMatrix for accented text. | Error | Remove the accented letters, or change the Symbology to DataMatrix. |
| “…”: wrong check digit for AI (…) in “…”. | Error | Fix the GTIN, SSCC or GLN: its last digit is the check digit. |
| “…”: GS1 content must be (AI)value pairs with AIs from the GS1 standard (“…”: …). | Error | Write the content as (01)08934567890120(10)LOT123, each AI in brackets. |
| “…”: the value of AI (…) has the wrong length (“…”). | Error | Give the value the length the GS1 standard sets for that AI. |
| “…”: the value of AI (…) has characters that are not allowed (“…”). | Error | Remove the odd characters; many AIs take digits only. |
| “…”: the date of AI (…) does not exist (“…”). | Error | GS1 dates are YYMMDD, for example 271231. |
| “…”: invalid GS1 data (“…”): … | Error | Read the reason at the end of the message and fix the content. |
| “…”: cannot make a code from “…”: … | Error | Usually the content is too long for the symbology: shorten it. |
| “…”: the GS1-128 is … mm wide, over the … mm the standard allows. Lower X or shorten the content. | Error | Lower Module X or shorten the content. |
| The scan test could not read “…” correctly at 300 dpi. Raise X or the height, and check the quiet zones. | Error | Raise Module X or the Bar height; move other elements out of the quiet zones. |
| “…”: X is only … mm, below … mm; hard to print and to scan. | Warning | Raise Module X. The minimum is the symbology's own, and when printing on standard paper at least 2 dots of the chosen printer. |
| “…”: X … mm is … dots of the … dpi printer, so the bars print unevenly. Use … mm. | Warning | Click the Use … button under Module X. Only shown when printing on standard paper: a die-cut layout is not rounded to dots. |
| “…”: the bars are … mm tall, below the … mm the standard asks for. | Warning | Raise the Bar height. When an EAN/UPC grows with X, its bars must grow taller too. |
| “…”: low contrast under a scanner’s red light (…:1). Print the bars in a dark colour such as black or dark blue, not red or orange. | Warning | Set the Bar colour to a dark colour and the Code background to a light one. |
| Another element overlaps the quiet zones of “…”, or they leave the label. | Warning | Move other elements out of the dashed line around the code, or move the code into the label. For a dark image or fill under the code: untick Transparent under Code background so it covers the quiet zones. |
12. Keyboard shortcuts
Click ? in the top right corner to see this list in the app.
| Keys | Action |
|---|---|
| V T Q B I R L | Select · Text · QR · Barcode · Image · Rectangle · Line |
| Tab · Shift+Tab | Select the next element (canvas focused) |
| Esc | Drop what was typed in a field · deselect on the canvas |
| ← ↑ → ↓ | Nudge 0.1 mm (Shift: 1 mm) |
| Ctrl while dragging | Temporarily disable snapping |
| Shift · Alt while resizing | Keep proportions · resize from centre |
| Ctrl+Z · Ctrl+Y | Undo · redo |
| Ctrl+D · Delete | Duplicate · delete |
| Ctrl+0 · Ctrl+1 | Fit · 100 % |
| Ctrl+S | Save template |
| Ctrl+Shift+S | Save as… |
| Ctrl + mouse wheel | Zoom |
| Double-click | Edit text, QR or barcode content |
| Enter | Apply the number typed in a field |
Below the list is a line with the app's version, followed by beta. This means that the app has not yet been printed for real to measure the labels, and its barcodes have not yet been read with real scanners. Before printing many, print one sheet, measure a label with a ruler and scan the codes (section 9).
At the bottom is the Third-party notices button. It opens the list of other parties' software, fonts and colour data that Tktem uses, with the licence of each. The list is a text file installed with the app, and opens in Notepad or the computer's text viewer. If the file has been deleted from the install folder, the app shows Could not open the third-party notices: …. Reinstall Tktem to get the file back.
13. Troubleshooting
Labels print larger or smaller than designed. Print the PDF at 100 % (Actual size), check the paper in the tray, then calibrate the printer (section 9).
The QR code does not scan.
Look at the Print check panel: Modules should be 0.4 mm or more, the Quiet zone must be clear and the Scan test must say reads correctly. With a logo, keep the Logo size at 15 % or less and Error correction at H.
A barcode does not scan. Look at the Print check panel: X must not be below the symbology's minimum, the Quiet zone must be clear and the Scan test must say reads correctly. Print a test and scan it with a phone or a scanner. If the bars print thick, measure and enter the Ink spread (9.2).
A phone photo appears sideways or mirrored. The picture carries a rotation flag. Tktem shows and prints it as stored in the file, and shows a warning. Rotate the picture in a photo viewer, save it, then click Change image….
Typing decimals with a comma.
In number fields a comma becomes a decimal point: typing 1,5 gives 1.5.
Accented letters in the CSV file come out wrong. Save the file again from Excel as "CSV UTF-8".
Opening a template, the app says it has invalid values. The template file was edited by hand or is damaged. Numbers beyond a field's limits were pulled back to the limit, and text where a number belongs was replaced by the default. Check the template, then click Save.
The app says: This template was made with a newer Tktem. Update Tktem to open it: opening it here would lose what this version does not know. The template was saved by a newer Tktem than the one installed, for example with a kind of element this version does not have. The app does not open it, so that saving cannot lose that part. Update Tktem to the latest version in Microsoft Store, then open the template again.
Create PDF is greyed out. Read the red text right under the button (in Quick print: right above it): those are the errors to fix. If it says Reading the die-cut…, wait until the app has read the die-cut.
The die-cut PDF has no boxes. The label size must be close to the size of the boxes in the die-cut. Raise the Detection tolerance if the boxes differ slightly. The app reads the first page only. A rounded label only takes rounded boxes; a label with a Corner radius of 0 takes square boxes too. If the app says Could not read the die-cut PDF: … or The die-cut file is locked: … do as in 7.2.
Colours print differently from the screen. A screen gives off light and paper does not, so printed colours are less vivid, especially bright greens, oranges and purples. Open Exact print preview to see the colours almost as they print. If an office printer gives odd colours, try PDF colours set to Design colours. If your print shop does not print to FOGRA39, for example on plastic or silver labels, ask them for the CMYK values of your key colours and enter them (5.9).
The app closed unexpectedly. Start Tktem again and choose Restore (10.2).
14. What Tktem does not do
- Barcodes: EAN-13, UPC-A, EAN-8, Code 128, GS1-128, DataMatrix and GS1 DataMatrix. No ITF-14, Code 39 or PDF417 yet.
- It does not check whether you may use an EAN number: only its structure and check digit.
- It does not print directly: create the PDF, then print the PDF.
- It does not read Excel
.xlsxfiles: save them as CSV UTF-8. - Each text element is one line. There is no multi-line text and no text along a curve.
- Text and barcodes rotate by 0°, 90°, 180° or 270° only. Other elements do not rotate.
- No freehand drawing, gradients, shadows or element groups.
- RGB colours are converted for one print standard only, FOGRA39. No spot colours (Pantone), no PDF/X files.
- No multi-page labels.
- No thermal roll printers.